

Stainless steel laser cutting is one of the most reliable ways to achieve clean, precise cuts in stainless steel for everything from industrial parts to custom designs. If you simply want to understand how it works, knowing the basics can save time, reduce mistakes, and improve results.
In this guide, you’ll learn what stainless steel laser cutting involves, what affects cut quality, how thickness and settings play a role, common challenges to watch for, and practical tips to get better outcomes. By the end, you’ll have a clear understanding of what it takes to cut stainless steel efficiently and accurately.
Table Of Contents
How Does Stainless Steel Laser Cutting Work?
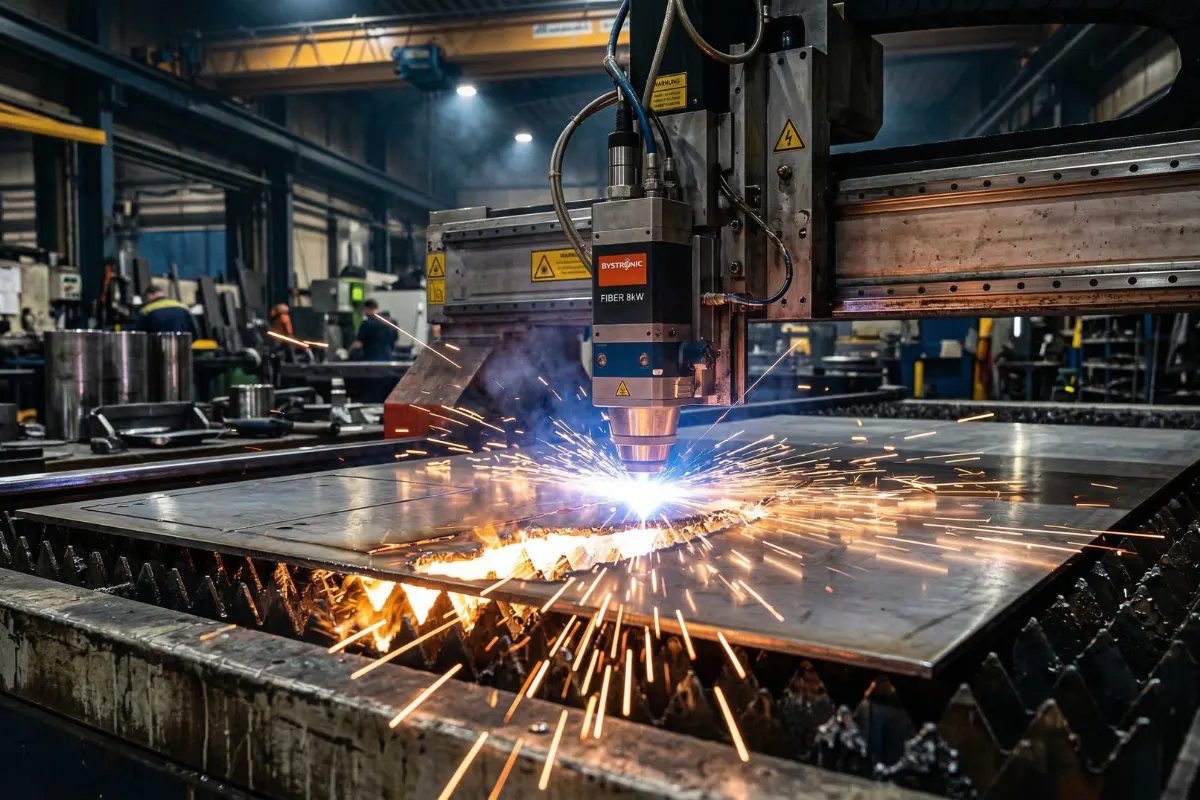
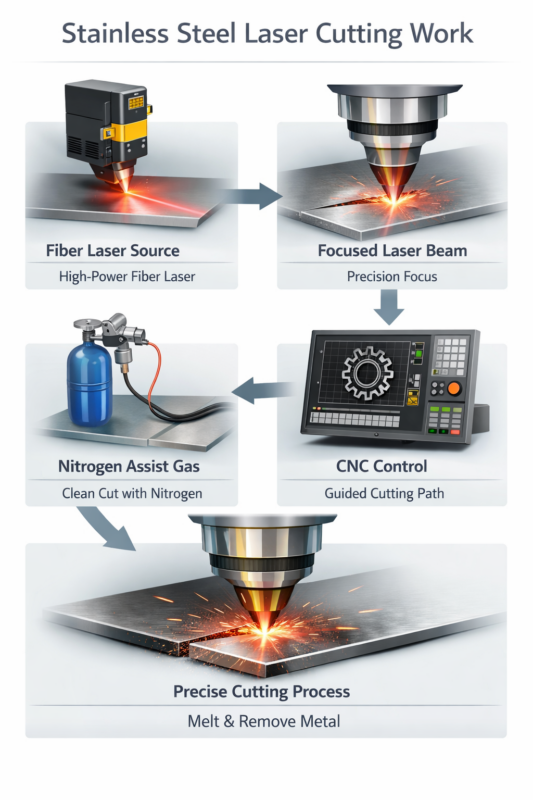
Laser cutting stainless steel uses a high-powered fiber laser, an assist gas, and CNC-guided movement to melt and remove metal with precision. The process is controlled digitally, enabling clean, accurate cuts with minimal finishing.
Here’s how the system works together:
- Fiber Laser Source: A fiber laser produces a tightly focused beam that delivers sufficient energy to cut stainless steel efficiently and with strong edge control.
- Focused Beam: The beam travels through fiber optics to the cutting head, where it’s compressed into a very fine point. This small focus area is what allows sharp details and narrow cuts.
- Nitrogen assist gas: Nitrogen is directed into the cut to push out molten metal while keeping oxygen away. This helps maintain a bright, smooth edge without discoloration.
- CNC-guided motion: A CNC system follows the CAD file and moves the laser along the exact path of the design, ensuring repeatable accuracy and steady cutting speed.
- Controlled cutting sequence: The operator sets speed, gas pressure, and focal position before cutting begins. The laser melts the metal, and the gas clears the debris as the cut progresses.
Read more: Metal Laser Cutting: Everything You Need to Know
Types Of Lasers Used For Stainless Steel Laser Cutting
A Fiber Metal Laser Cutting Machine is the most common choice for a stainless steel laser cutting machine, known for its speed, precision, and efficiency on thin to medium-thick sheets.
A CO2 Laser can also be used, especially for cutting thicker stainless steel plates. While both systems handle the job well, fiber lasers typically offer faster performance and lower operating costs, whereas CO2 lasers are better suited for heavier materials.
Fiber Laser vs CO2 Laser: Quick Comparison!
| Feature | Fiber Laser | CO2 Laser |
| Cutting Speed | Faster, especially on thin to medium-thick sheets | Slower compared to fiber on thinner materials |
| Precision | Very tight, clean cuts with consistent edges | Good precision, especially on thicker plates |
| Efficiency | Higher energy efficiency, lower power loss | Higher energy consumption |
| Material Thickness | Best for thin to medium thickness | Performs well on thicker stainless steel |
| Maintenance | Fewer components, lower maintenance needs | More components, higher maintenance requirements |
| Best Suited For | High-speed production and lower operating costs | Heavy-gauge stainless steel cutting |
Once you’ve identified the machine that fits your needs, the next question becomes practical: how thick can it cut? That answer depends on the machine’s power.
Stainless Steel Laser Cutting Thickness Chart
| Laser Power | Recommended Stainless Steel Thickness | Typical Use Case |
| 1kW | Up to ~3mm | Thin sheet metal, small parts |
| 3kW | Up to ~8mm | General fabrication work |
| 6kW | Up to ~15mm | Medium-thick industrial components |
| 10kW+ (Industrial) | 20mm and above | Heavy-duty plate cutting |
Note: Actual thickness depends on gas type, speed settings, and material grade.
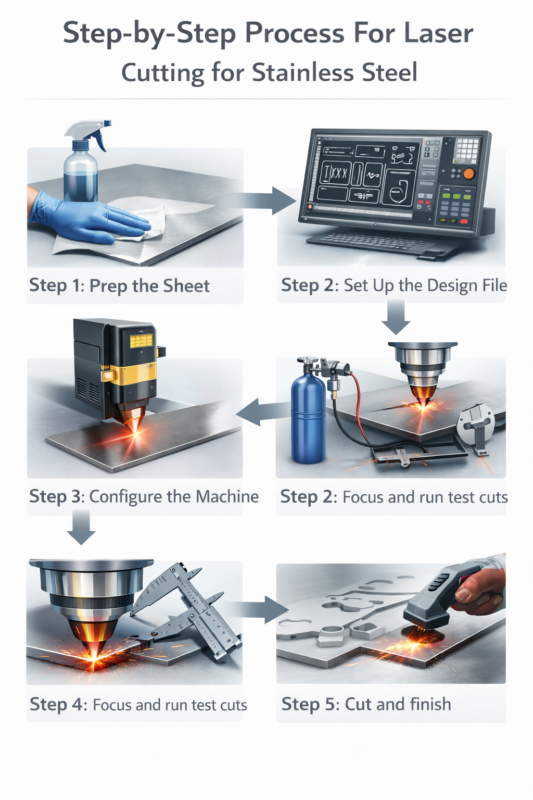
Step-by-Step Process For Laser Cutting For Stainless Steel
Laser cutting for stainless steel follows a clear workflow: prep the sheet, set the file, dial in the machine, test, cut, then finish the parts.
Here’s the entire process for clarity:
Step 1) Prep the sheet: Wipe the surface to remove oil, dust, rust, or residue. A clean sheet helps avoid spatter and messy edges.
Step 2) Set up the design file (CAD/CAM): Import your DXF/AI into the cutting software, nest parts to reduce waste, and add micro-joints/bridges to prevent small pieces from tipping or shifting during the cut.
Step 3) Configure the machine: Use a fiber laser setup for stainless when available. Match power and speed to thickness, choose nitrogen for clean edges, and run a single-nozzle, high-pressure nitrogen setup.
Step 4) Focus and run test cuts: Set the focal point based on thickness (often at or slightly below the underside). Test on scrap and check for dross on the bottom edge.
Step 5) Cut and finish: Run the job, then remove the parts and deburr or lightly sand if needed for a smoother edge.
| Pro Tip:Check the lens and nozzle before each job. Even minor buildup or wear can affect beam quality and cut consistency during laser cutting for stainless steel. |
Watch our machine in action in this YouTube video: Fiber Laser Cutting Machine | Cutting 3MM Stainless Steel
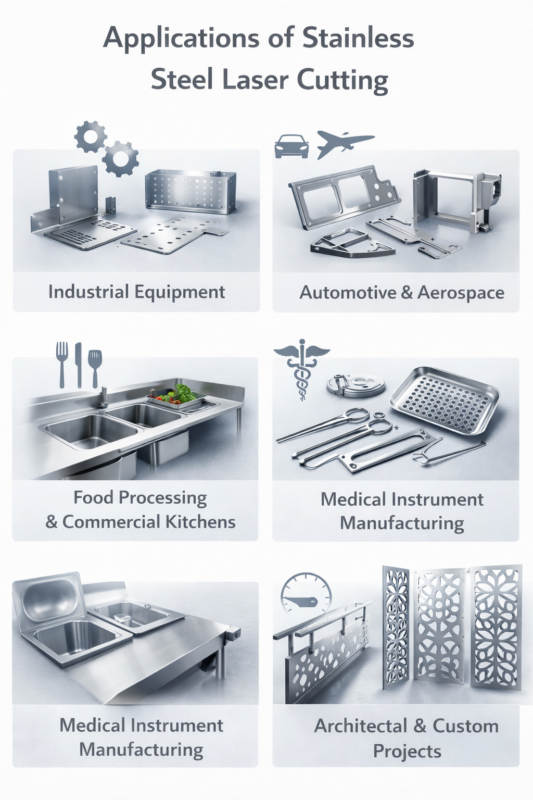
Applications Of Stainless Steel Laser Cutting
Stainless steel laser cutting is used wherever accurate shaping and clean separation of metal sheets are required. From heavy industry to design-driven projects, it supports a wide range of practical applications.
Industrial Equipment
Commonly used to produce panels, mounting plates, structural supports, and machinery components with consistent dimensions.
Automotive & Aerospace
Applied in fabricating brackets, covers, frames, and other precision parts that require exact fit and repeatability.
Food Processing & Commercial Kitchens
Used to cut stainless components for prep tables, storage units, and processing equipment where durability and hygiene standards are important.
Architectural & Custom Projects
Frequently chosen for railings, decorative screens, signage, and metal art, where detailed patterns and sharp edges are needed.
Medical Instrument Manufacturing
Used to create medical surgical tools, trays, brackets, and precision medical components where tight tolerances and smooth edges are essential.
Read more: Laser Marking Has Found Its Way in the Automotive Industry!
Common Problems And How To Fix Them
Even with the right setup, stainless steel laser cutting can run into small issues. Most are easy to spot and easy to correct.
Burrs After Laser Cutting
What you’ll notice: Rough buildup along the bottom edge.
Why it happens: It could be a speed that’s too high, a gas pressure that’s too low, or an incorrect focus.
Quick fix: Slow the cut slightly, increase nitrogen pressure, and check focal position.
Burn Marks on Stainless Steel
What you’ll notice: Dark or discolored edges.
Why it happens: Oxygen exposure or unstable gas flow can cause this.
Quick fix: Switch to nitrogen for cleaner edges and confirm steady gas pressure.
Rough Edges During Laser Cutting
What you’ll notice: Uneven or jagged cut lines.
Why it happens: A worn nozzle, dirty lens, or incorrect power settings can deliver such results.
Quick fix: Inspect consumables, clean optics, and fine-tune speed and power.
Also read: Stainless Steel Laser Engraving: The Ultimate Guide
Frequently Asked Questions
1. Does stainless steel laser cutting require special surface preparation?
Yes, basic cleaning is recommended. Removing oil, dirt, or residue helps maintain consistent cut quality and reduces edge imperfections.
2. Can stainless steel laser cutting be automated?
Yes. Most modern systems operate with CNC control, allowing automated production runs with consistent accuracy.
3. Is stainless steel laser cutting suitable for small batch production?
Yes. It works well for both small custom jobs and large-scale production because setup changes are handled digitally.
4. How accurate is stainless steel laser cutting?
Laser systems can achieve very tight tolerances, often within fractions of a millimeter, depending on machine quality and setup.